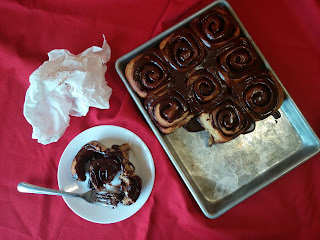
Peanut Buttery Chocolate Buns

DLD: Peanut Buttery Chocolate Rolls
Dinner in the Life of a Dad—Peanut Buttery Chocolate Buns. Gooey and delicious, chocolatey and peanut buttery. Great alternative to cinnamon rolls!

I really don't know what to say about this recipe because I can only say delicious so many times. These buns are truly, completely, and amazingly delicious.

The idea from this recipe came from wanting to create, of all things, peanut butter and jelly bread. I found lots of recipes online for peanut butter quick breads, and for buns made from rolling out regular dough and spreading it with peanut butter and jelly before rolling it up again. They looked good, but seemed really messy, and I have never considered quick breads to be a true bread, but rather a kind of cake. I wanted sliceable sandwich bread with peanut butter in the dough. Once again, I had to make up my own recipe. Oh darn. (^_^)

I made a loaf, and found it to be tasty, and I immediately starting thinking of the possibilities. Then I saw an episode of Cook's Country where they made cinnamon buns, and the idea for this recipe just came together.

Basically, this is a basic sweet roll dough with peanut butter replacing the fat in the dough. I had to take out some of the flour as well to make up for the solids in the peanut butter, but more on that later. The filling is your typical cinnamon roll filling except you replace the cinnamon with cocoa powder. Instead of cream cheese filling I decided to go with a chocolate donut glaze to complete the recipe.

The flavor is intensely peanut buttery, with chocolate permeating the entire bun. If you are fan of peanut butter filled chocolate cups, you will absolutely love this recipe. Just make sure you invite some friends over or you will end up eating the entire batch by yourself.

Skip the tutorial and go straight to the recipe.

Step 1

In a stand mixer bowl fitted with the paddle attachment, combine 3 cups flour, 1/4 cup brown sugar, 1 1/2 tsp salt, and 2 1/4 tsp (1 package) yeast.
Beat 1 large egg plus 1 yolk with 3/4 cup cool water, then add to the mixer. Mix on medium speed for 3 minutes.
The dough WILL be very, very sticky. To be honest, it is more of a stiff batter than a dough at this point.
DON'T add any additional flour at this step. Be patient—everything will be okay.

Step 2:

Switch from the paddle to the dough hook.
Add 1/2 cup peanut butter to the bowl, and mix on medium speed until all the peanut butter is absorbed.
Use a spatula to loosen the dough from the side of the bowl if needed.
I imagine some of you may be asking yourselves what just happened. To be honest, this is my favorite trick to this recipe. The reason why the dough all of a sudden turned from a batter to a dough when all you added was peanut butter is that peanut butter is actually very dry—less than 2% water (this is compared to 12% water found in flour). So peanut butter is much more effective at drying out a dough than flour.


Step 3:

Increase the speed slightly and knead the dough for 5 minutes.

Step 4:

Remove the dough from the mixer and form into a ball. Roll the ball on the counter to create a gluten-cloak.
Spray the empty mixing bowl with nonstick spray and return the dough to the bowl. Cover with a piece of plastic and allow to rise until double.
This is a very rich dough. As such, it will take a long time to rise. Both the sugar and the fat have an inhibiting effect on the rate of fermentation. So, let the dough take its time. Your patience will definitely be rewarded.

Step 5:

While the dough is rising, prepare the filling.
Mix together 7/8 cup superfine sugar*, 1 Tbsp cocoa powder, and 1/4 tsp salt. Stir in 2 Tbsp melted butter and 1 tsp vanilla extract until the mixture resembles wet sand.
*To make superfine sugar, process 1 cup granulated sugar in a food processor until it is a very fine powder.
Set the filling aside until the dough has finished rising.

Step 5b:

Preheat the oven to 350°F, and make sure you have a rack in the middle position of your oven.
Spray a 9" square baking dish, line it with parchment paper, and then grease the parchment. Set the pan aside until later.

Step 6:

The dough has finished rising, so now it is time to assemble the buns.
Take the dough out of the mixing bowl and roll it out into a rectangle. You are looking for it to be 1/4" thick and around 15" by 9", with the long side parallel to the counter edge.
Melt an additional 2 Tbsp butter and brush the rectangle with the butter everywhere except a 1/2" border on the far edge.
The melted butter helps the filling stick, but it will also keep the roll from sealing together. Keeping a small border will give you a surface to seal the roll closed.

Step 6b:

Sprinkle the buttered dough evenly with the filling, then press the filling firmly into the dough.
Use a spatula or dough scraper to loosen the dough edge closest to you (or the counter), and start to roll up the dough into a tight log. When you get to the end, pinch the seam to seal it.

Step 7:

Roll the log seam side down and carefully cut into 9 equal pieces, each about 1 1-2" thick.
There are really 2 ways to go about cutting something really soft like this roll.
First, you can use a very serrated knife, and saw carefully through the log, taking care not to press down too hard. I have done this successfully in the past, and it works well as long as the dough isn't too sticky.
The second method is to use a long piece of thread or unflavored dental floss. Carefully wrap the floss around the circumference of the roll and pull the 2 ends across each other to slice through the roll. This method works if the dough is a little softer, but you may have to reshape the rolls after cutting them.
Either method will work, so I will leave the choice up to you.

Step 7b:

Arrange the buns (cut side up) in the prepared pan, and brush the tops with a final 2 Tbsp of melted butter.
Cover the pan loosely with plastic wrap and let the buns rise until double. This should take about 30-45 minutes, but may take as long as an hour.

Step 8:

Slide the pan of risen buns into the oven and bake for 24 minutes, give or take, until the edges are brown...well, browner.

Step 9:

When the buns come out of the oven, run a plastic utensil (like a knife) around the edge of the pan to loosen the buns from the sides. Then let everything cool for about 5 minutes.
Now comes the time for a few acrobatics. (^_^) The goal is to remove the parchment from underneath the baked rolls, so here we go.
Invert a large plate or cooling rack over the top of the pan. Using potholders, flip the plate/rack and pan upside-down, then lift off the pan and remove the piece of parchment paper.
Replace the pan on the upside-down buns and reinvert. Exercise patience and allow the buns to cool for a final five minutes while you prepare the chocolate glaze.

Step 10:

In a microwave safe bowl, whisk together 6 Tbsp milk, 4 Tbsp cocoa powder, 1 Tbsp corn syrup, 2 Tbsp peanut butter, and 2 Tbsp melted butter, 1 tsp vanilla, and 1/4 tsp salt.
Heat the mixture to boiling in the microwave, about 2-3 minutes on high.
Pour the hot mixture over 4 cups (1 pound) powdered sugar, and whisk until smooth.
Add additional milk to thin the glaze if you want.
Apply the hot glaze to the slightly-cooled buns and devour.

Dinner in the Life of a Dad—Peanut Buttery Chocolate Buns. Make sure you get someone to help you eat these or you'll eat the whole pan yourself!

Chocolate-Filled Peanut Butter BunsYields: 9 Buns


Dough Ingredients
Filling Ingredients
Glaze Ingredients
Dough Ingredients Filling Ingredients Glaze Ingredients
3 cups Flour 7/8 cups Superfine Sugar 6 Tbsp Milk
1/4 cup Brown Sugar 1 Tbsp Cocoa Powder 4 Tbsp Cocoa Powder
1 1/2 tsp Salt 1/4 tsp Salt 1 Tbsp Corn Syrup
1 1/2 tsp Yeast 6 Tbsp Buter, melted, divided 2 Tbsp Butter, melter
1 egg + 1 yolk 1 tsp Vanilla Extract 4 cups Powdered Sugar
3/4 cup Water 1 tsp Vanilla
3/4 cup Peanut Butter 1/4 tsp Salt
2 Tbsp Peanut Butter

Dough Instructions:

In a stand mixer fitted with the paddle attachment, combine all dough dry ingredients. Beat the egg and yolk with the water and add to the blended dry ingrdients. Mix on medium speed for 3 minutes. Switch to the dough hook and add the peanut butter. Continue to mix on medium speed until all of the peanut butter is absorbed and the dough cleans the side of the bowl. Knead the dough for 4 minutes. Remove the dough from the mixer and form into a ball. Return the dough to the bowl and cover. Allow to rise until double, about 1 hour.

Filling Instructions:

Combine sugar, cocoa powder, and salt in a bowl. Stir in 2 Tbsp (28g) melted butter and vanilla until the mixture resembles wet sand. Set aside.

Assembly Instructions:

Preheat oven to 350°F.
Grease a dark 9" square baking dish, line with parchment paper, and grease the parchment. Set aside.
Roll the risen dough into a rectangle 1/4" thick, approximately 15" by 12", with the long side parallel to the counter edge. Brush with 2 Tbsp (28g) melted butter, leaving a 1/2" border on the far edge. Sprinkle the dough evenly with the filling, then press the filling firmly into the dough. Carefully roll the dough away from you into a tight log, and pinch the seam to seal it.
Roll the log seam side down, and cut into 9 equal pieces. Arrange the pieces evenly in the prepared pan. Brush the tops of the buns with the remaining 2 Tbsp (28g) melted butter. Cover loosely with plasic wrap and let rise until double, about 45 minutes-1 hour.
Remove the plastic wrap and bake the buns until the edges are "well-browned", about 24 minutes. Loosen the buns from the sides of the pan with a plastic knife and let cool for 5 minutes.
Invert a large plate over the pan. Using potholders, flip the plate and pan upside down, then remove the pan and the parchment paper. Replace the pan and reinvert. Allow to cool for an additional 5 minutes while you prepare the glaze.

Glaze Instructions:

Whisk together the water, peanut butter, butter, corn syrup, and cocoa powder in a microwave safe bowl. Microwave until the mixture boils, about 2-3 minutes. Pour the hot mixture over the powdered sugar and whisk until smooth.
Apply the hot glaze to the buns and enjoy.

This recipe was printed from Dinner in the Life of a Dad (samslaugh.blogspot.com)
Chocolate-Filled Peanut Butter Buns 9 buns A rich peanut butter dough spiraled around a sugary chocolate filling and drizzled with a sweet chocolate glaze. 00:24:00 02:30:00 3 cups Flour 1/4 cup Brown Sugar 7/8 cup Superfine Sugar 5 Tbsp Cocoa Powder 2 tsp Salt 2 1/4 tsp (1 package) Yeast 1 Egg 1 Egg Yolk 1 1/8 cup Water 1/2 cup Butter 2 tsp Vanilla 1 Tbsp Corn Syrup 4 cups Powdered Sugar 7/8 cups Peanut Butter

No comments :

Post a Comment